
이번 강의에서는 애니메이션 기능에 대해 배웁니다. 다음은 이전 강의에서 언급했던 UIView Animation을 통해 바꿀 수 있는 값들입니다.
- frame/center
- bounds (center를 변화시키는 것과 다르다.)
- transform (translation, rotation and scale)
- alpha
- backgroundColor
위 값들은 UIViewPropertyAnimator를 사용하면서 변경할 수 있다고 합니다. UIViewPropertyAnimator에 애니메이션을 수행하는 코드 블럭을 넣고 실행하게 됩니다. 그리고 "completion block"을 통해 애니메이션이 종료되었을 때 수행할 코드 블럭도 넣을 수 있습니다.
UIViewPropertyAnimator
다음은 UIViewPropertyAnimator를 사용하는 가장 간단한 방법과 예시입니다.
class func runningPropertyAnimator(
     withDuration: TimeInterval,
            delay: TimeInterval,
          options: UIViewAnimationOptions,
       animations: () -> Void,
       completion: ((position: UIViewAnimatingPosition) -> Void)? = nil
)
if myView.alpha == 1.0 {
UIViewPropertyAnimator.runningPropertyAnimator(
withDuration: 3.0,
delay: 2.0,
options: [.allowUserInteraction],
animations: { myView.alpha = 0.0 },
completion: { if $0 == .end { myView.removeFromSuperview() } }
)
print(“alpha = \(myView.alpha)”)
}값을 바꾸면서 애니메이션을 실행할 때 애니메이션 끝난 후 값이 바뀌는 것이 아니라 애니메이션 실행 즉시 값이 바뀝니다.
UIView Animation - UIViewAimationOptions
- beginFromCurrentState 👉 현재 상태에서 다른 애니메이션을 시작할 때 시작
- allowUserInteraction 👉 애니메이션이 일어나는 동안 제스처를 허용
- layoutSubviews 👉 subView들이 다시 배치될 때 애니메이션을 재생
- repeat 👉 반복
- autoreverse 👉 재생, 역재생 개념
- overrideInheritedDuration 👉 설정하지 않으면 duration(iOS에 정한)을 사용
- overrideInheritedCurve 👉 설정하지 않으면 애니메이션에 curve 사용
- allowAnimatedContent 👉 뷰의 속성 값이 바뀌면서 뷰를 다시 그릴 때 애니메이션을 적용
- curveEaseInEaseOut
- curveEaseIn
- curveLinear
curve는 애니메이션의 속력을 나타낸다고 생각하시면 됩니다. 아래 링크는 CSS의 transition에서 curve가 어떻게 동작하는지에 대한 설명인데 iOS의 curve와 같은 맥락이니 참고하시면 좋을 것 같습니다.
https://developer.tizen.org/community/tip-tech/working-css3-transitions

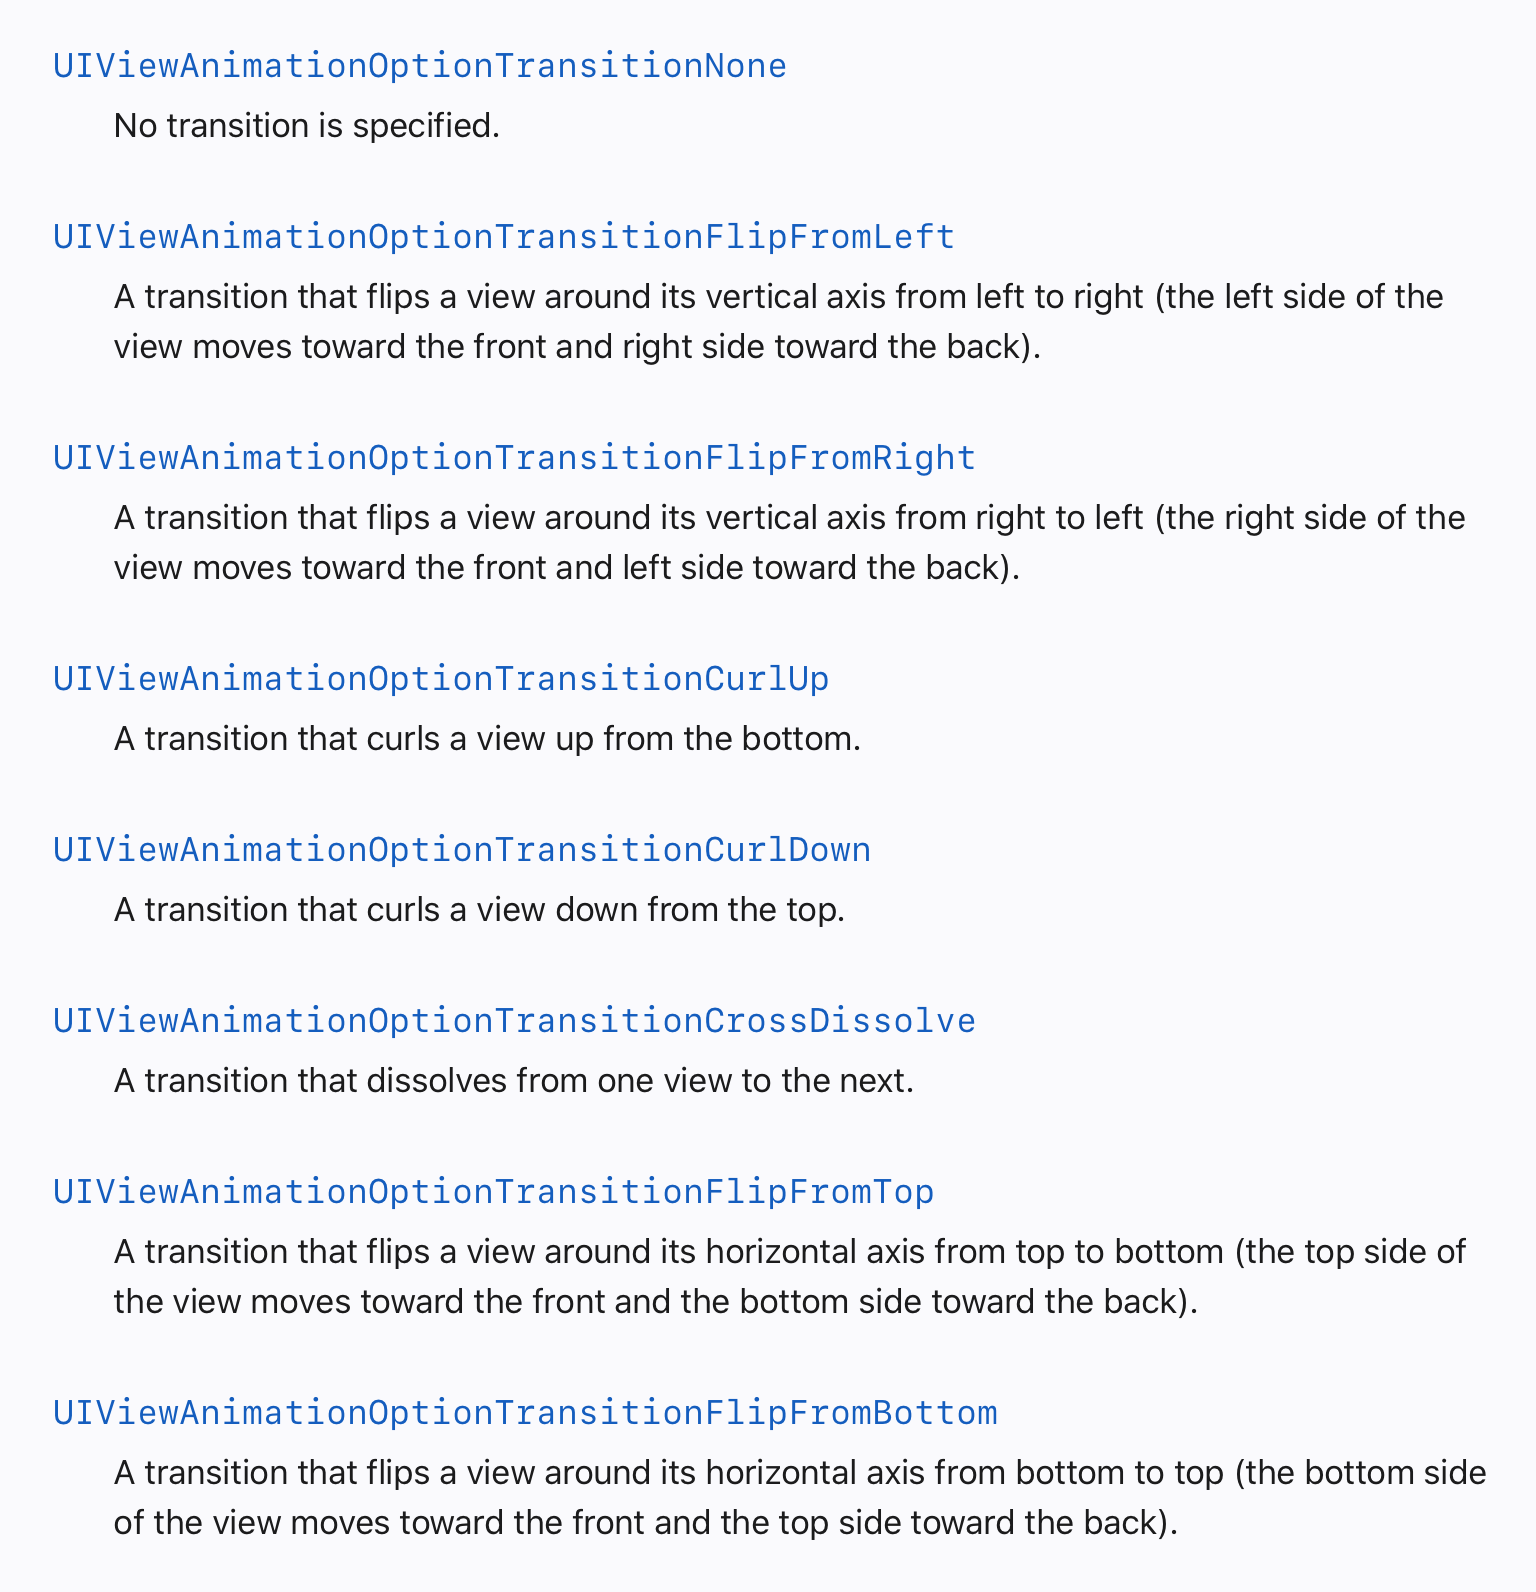
위 애니메이션 옵션들을 통해 뷰 전체를 다른 뷰로 바꾸는 애니메이션을 실행할 수 있습니다. 아래는 코드 예시입니다. 카드를 터치했을 때 cardIsFaceUp 변수를 바꾸면서 카드가 flip 되는 애니메이션을 실행하게 됩니다.
UIView.transition(with: myPlayingCardView,
              duration: 0.75,
               options: [.transitionFlipFromLeft],
            animations: { cardIsFaceUp = !cardIsFaceUp }
            completion: nil)
Dynamic Animation
- animator 를 만든다.
var animator = UIDynamicAnimator(referenceView: UIView) - UIDynamicBehavior 인스턴스를 생성한 후 animator에 추가해준다
let gravity = UIGravityBehavior( )
animator.addBehavior(gravity)
collider = UICollisionBehavior( )
animator.addBehavior(collider) - UIDynamicItem을 추가해준다
let item1: UIDynamicItem = ... // usually a UIView
let item2: UIDynamicItem = ... // usually a UIView gravity.addItem(item1)
collider.addItem(item1)
gravity.addItem(item2)
UIDynamicItem protocol
Dynamic animation을 만들어 줄 때 UIDynamicItem를 구현한 UIView를 넣어줍니다. bounds, center, transform은 UIView에서 자동으로 구현됩니다.
protocol UIDynamicItem {
  var bounds: CGRect{ get } //essentiallythesize
  var center: CGPoint { get set } // and the position
  var transform: CGAffineTransform{ get set } //rotationusually
  var collisionBoundsType: UIDynamicItemCollisionBoundsType { get set }
  var collisionBoundingPath: UIBezierPath { get set }
}
UIGravityBehavior
var angle:CGFloat //inradians; 0 is to the right; positive numbers are clockwise
var magnitude:CGFloat //1.0 is 1000 points/s/s
UIAttachmentBehavior
객체가 다른 객체 혹은 지점에 붙게 하는 동작입니다. 아래 링크의 영상을 보면 조금 더 이해하기 편할 것 같습니다.
https://youtu.be/-xbKHTG7Kg4
init(item: UIDynamicItem, attachedToAnchor: CGPoint)
init(item: UIDynamicItem, attachedTo: UIDynamicItem)
init(item: UIDynamicItem, offsetFromCenter: CGPoint, attachedTo[Anchor]...)
var length: CGFloat // distance between attached things (this is settable while animating!)
var anchorPoint: CGPoint // can also be set at any time, even while animating
UICollisionBehavior
UIView가 서로 충돌하거나 BezierPath와 충돌하는 동작입니다.
func addBoundary(withIdentifier: NSCopying, for: UIBezierPath)
func addBoundary(withIdentifier: NSCopying, from: CGPoint, to: CGPoint)
func removeBoundary(withIdentifier: NSCopying)
var translatesReferenceBoundsIntoBoundary: Bool // referenceView’s edges
UICollisionBehavior는 delegate을 가지고 있어서 언제 충돌했는지 알려줄 수 있습니다.
var collisionDelegate: UICollisionBehaviorDelegate

func collisionBehavior(behavior: UICollisionBehavior,
          began/endedContactFor: UIDynamicItem,
          withBoundaryIdentifier:NSCopying //with:UIDynamicItemtoo at: CGPoint)
UISnapBehavior
Dynamic animation을 사용할 때 어떻게 움직일지 결정할 때 사용합니다. 마치 스프링이 달린 것 같은 효과를 줄 수 있습니다.
참고영상: https://youtu.be/ulB49kAIK1o
init(item: UIDynamicItem, snapTo: CGPoint)
UIDynamicItemBehavior
"meta" 동작이라고 합니다. 이미 만들어진 behavior에 추가 정보를 넣어줄 때 사용할 수 있습니다.
UIDynamicBehavior
위 behavior들의 superclass입니다. Subclass를 만들어서 직접 만들 수 있지만 쉽지 않을 수 있습니다. 대신 여러 동작들을 한번에 묶을 때 사용할 수 있습니다.
Apple Developer Documentation
developer.apple.com
Stasis (정지)
UIDynamicAnimator의 delegate가 애니메이션이 멈출 때를 알려줍니다.
var delegate: UIDynamicAnimatorDelegate
// ... and you’ll find out when stasis is reached and when animation will resume ...
func dynamicAnimatorDidPause(UIDynamicAnimator)
func dynamicAnimatorWillResume(UIDynamicAnimator)
Memory Cycle Avoidance
클로저 캡처로 인해 아래 코드 처럼 스스로가 스스로를 가리키는 상황이 발생해서 힙에서 영원히 사라지지 않는 상황이 발생합니다. 그래서 클로저 안에서 초기값을 직접 설정해주는 것으로 메모리 사이클을 피할 수 있습니다.
if let pushBehavior = UIPushBehavior(items: [...], mode: .instantaneous) {
      pushBehavior.magnitude = ...
      pushBehavior.angle = ...
      pushBehavior.action = {
          pushBehavior.dynamicAnimator!.removeBehavior(pushBehavior)
      }
      animator.addBehavior(pushBehavior) // will push right away
  }
아래 코드 처럼 someInstanceOfaClass 변수를 직접 사용하는 것이 아닌 클로저 내의 변수로 초기화 해준 후 사용하면 클로저 실행이 끝난 후 해당 블럭 내의 변수들이 힙에서 제거 될 때 x도 같이 제거되면서 사용하지 않는 객체에 대한 메모리 낭비를 없앨 수 있습니다.
var foo = { [x = someInstanceOfaClass, y = “hello”] in
	// use x and y here
}

var foo = { [weak x = someInstanceOfaClass, y = “hello”] in
	// use x and y here, but x is now an Optional because it’s weak
}

var foo = { [unowned x = someInstanceOfaClass, y = “hello”] in
  // use x and y here, x is not an Optional
  // if you use x here and it is not in the heap, you will crash
}
weak과 unowned의 차이
weak은 변수가 해제될 때 nil로 초기화 되지만, unowned는 nil이 아닌 빈공간을 계속 참조하고 있습니다. 이 경우 unowend 변수에 댕글링 포인터가 남는다는 표현을 합니다. 그래서 weak와 달리 unowned는 사라지지 않을거라고 보장되는 객체에만 설정되어야 합니다.
유튜브 링크
Stanford - Developing iOS 11 Apps with Swift - 8. Animation
Stanford CS 193P Stanford - Developing iOS 11 Apps with Swift - 8. Animation Paul Hegarty continues his coverage of Animation. All the lecture slides pdfs, demo codes and reading assignments can be found here: https://drive.google.com/open?id=14uxqi3ew
youtu.be
참고 링크
Apple Developer Documentation
developer.apple.com
Working with CSS3 Transitions | Tizen Developers
developer.tizen.org
[Swift] 메모리를 참조하는 방법 (Strong, Weak, Unowned)
* ARC(Automatic Reference Counting) 란? - 컴파일 시 코드를 분석해서 자동으로 retain, release 코드를 생성해주는 것. - 참조된 횟수를 추적해 더 이상 참조되지 않는 인스턴스를 메모리에서 해제해 주는 것.
devsrkim.tistory.com
'CS193P' 카테고리의 다른 글
| [iOS] 스탠포드 CS193P 10강 (0) | 2021.09.14 |
|---|---|
| [iOS] 스탠포드 CS193P 9강 (0) | 2021.09.02 |
| [iOS] 스탠포드 CS193P 7강 (0) | 2021.09.01 |
| [iOS] 스탠포드 CS193P 6강 (0) | 2021.08.31 |
| [iOS] 스탠포드 CS193P 5강 - 2 (0) | 2021.08.20 |